Sunday, August 26, 2012

The Shop Gets Built

Rick's crew was scheduled to set the roof trusses next.  They would set perlins and windows and lots of odds and ends before the closed in the walls.  I figured I had enough time between the big concrete pour and when they covered the walls to rough in the plumbing and pour the bathroom floor. That gave me the option to run the concrete chute in through the wall.


As it turned out, the concrete truck driver thought it would be best if I wheel barrowed it in from the big door opening.  That wasn't too bad as we had a very nice floor to run the wheel barrow on. I used blocks of Styrofoam to leave space around the shower and toilet drain pipes so I could set the flanges more precisely later.


It all went well.  Sorry I didn't take a picture of the finished floor.  I set a capped toilet flange to leave the option of a toilet for the future.  There is a drain for a utility sink and a floor drain in a lowered area at the end of the room for a shower (or dog wash, etc.).  The drain runs under the slab (2 feet deep) to a T and clean-out just out side the building.  I also stubbed in a water supply pipe.  The outside connections to these pipes will be done later.


By the end of week 2, it looked like this.  Yet to be done, overhead garage door, gutters, and cupola.


 Originally, we had designed the shop to have a 16X24 foot open shed addition, but when laying out the site, we couldn't make it fit.  So, we opted to build it detached.  I had decided to put it parallel with the shop, even with the front with a 23 foot space between.  This was as far from the shop as I could place it before it got too close to the power pole, or road, or the place where Jason buried the trash left from clearing.  The spot for this shed needed to be leveled   But after Jason leveled the spot and we could actually see it, we realized 23 feet was not enough room to turn a vehicle (or especially one with a trailer) into the shed.  Jan and I scratched our heads and tried all kinds ways to make it work.  Finally, we simply twisted it a bit towards the front.  It's not great, but it is possible to pull into the shed and still have enough room to drive between the buildings and around the end of the shop.


I've been wanting to hook up the water since we first started burning our cleared brush, but it just hasn't worked out.  I did make a move in that direction, though.  I called the water company to come out and turn on the water, just to see if we had any problems with the valve, etc.  The meter is way off the North East corner of our property, at least 300 feet from our driveway.  When they turned the valve, the meter spun and didn't stop.  Something was certainly wrong.  Turn it off.  We walked down the road toward our drive and there was a nice river flowing from a spot on the edge of the road by the driveway.  I dug it up and found that when the phone company ran their wire, they shredded our water pipe.  Oh well, at least now we know where the pipe is.


Now, I've got to get back to work for a while.  I mean work where I get paid rather than work where I pay.
Next time we see Moss Hollow, the shed and shop should be built and I can run the power and water and get Jason to do a finish grade.  Then lots of gravel, finishing the inside of the shop, landscaping, and planning the next phase: house.


Saturday, August 25, 2012

Pure Inspiration

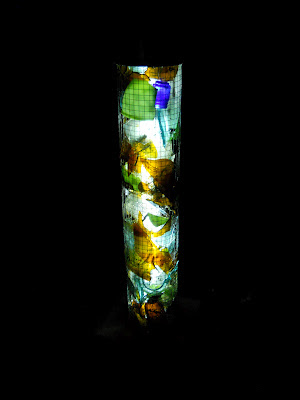
A while back I had a crazy idea.  I was thinking about cleaning up the bottle dump on our property.  Although it poses a bit of a clean-up problem, it really is one of the only remnants of the historic occupation. 

It came to me in a flash.  The idea was to use the broken glass in a column of light.  A series of them would be stunning marking a path through the woods.

So, when I found myself with a little free time, before the concrete was due, I thought I'd give it a shot.  I wanted to give it a heavy, concrete base, so, since the concrete truck was coming anyway, I made a simple box form and installed a 1.25 inch PVC elbow in the middle with a length of pipe sticking out the side and a florescent tube cover vertically up the middle.  I fashioned a 6 inch diameter column of hardware cloth; ready to be stuck into the concrete. I had a 6 inch PVC cap ready as well.

                                           This what it looked like after the concrete was set.

I fed a 50 light string of clear LED Christmas lights through the tube.  I think next time I will put the lights in before the concrete. It was a bit dificult to get the plug to make the turn through the elbow.


  I then set broken glass from the dump in the space between the clear tube and the hardware cloth.  Then capped it with the PVC cap.  It looked like this:
It certainly didn't look like much in the daylight, but at night it ain't bad.  It looks pretty much as I had pictured in my vision.  I don't see much I would change.  One thing, for sure.  I had used 1/2 inch hardware cloth.  Some of the sharp glass does stick through, so next time I'll use 1/4 inch.


Back To It; The Shop Rises

After a week in the North Woods on a lake straddling the Wisconsin Michigan boarder, we got back to work on our property in S. Ill.

Our pole building contractor, Rick, was scheduled to  begin the shop building on Monday, August 6 and they got right to work.  In our absence, Jason had done a final grade on the site; providing a much leveler pad for the building.  Before this work, the place where we laid out the building had a 2.5 foot elevation difference from corner to corner.  Jason got it very close to level with a bit of cutting and filling.

We chose pole construction because of it's efficient use of time and materials.  It certainly did go fast.
It looked like this by Tuesday evening, almost ready for gravel and concrete:


The one thing we needed to do before the concrete could go in was to install the perimeter foam insulation.
I talked about this in the previous post.  Go back if you missed it.

We scheduled the concrete at this point (no roof trusses) so that the gravel truck and concrete truck could back into the building to dump.  I planned a bathroom in one corner, but knew I wouldn't have time to rough-in the plumbing before the concrete pour, so I set a couple of forms to pour it later.  The gravel base was set, and the concrete was poured.


Insulation Odyssey

In the last post, I talked about the foundation insulation.  I did pack it up in Virginia and haul it to Carbondale via the U. P. of Michigan.  It was a bit tight in the cab, but Jasper did not have to ride on top.  By the time we unloaded in Southern Illinois, the foam had traveled 2000 miles.

The foam insulation was to be installed vertically around the edges of the concrete slab 2 inches thick and 2 feet deep.  The idea is to trap the heat in the slab and soil beneath.  The foam would need to be installed after the walls were framed, inside of the band board (which also serves as the concrete form).  Then the concrete would be poured.

At this point, I'll jump ahead to the foam stuff, since that's the topic, here.  But a couple things happened first.  So if you want to keep things in strict chronological order, stop reading and skip to the next entry.

Any way, back to the foam.  I had a relatively small window of time to get it installed.  The band board was set on Tuesday and Jason wanted to get the gravel base for the concrete in on Wednesday or Thursday and pour on Friday or Saturday.  In the middle of a horrible drought, the soil was hard as rock and it was August in Southern Illinois (hot) and I'm old.  So very luckily, I found some help:  Super Al.


 I must admit, Al did almost all the digging while I cut and fit the foam.  Al got all the digging done and I fit most of the foam in one day.  The next day I fit the rest and back-filled the soil around the foam that Al hadn't gotten to.


The final step in this process was to wrap the top exposed edge of the foam board/band board sandwich with self adhesive rubber flashing.  This will act as an additional termite barrier as well as moisture flashing.


 So, that's ready for gravel base and then concrete.  Oh, one other thing before the concrete. I want to rough-in a bathroom in one corner, even if I never add the toilet.  And I really didn't have time to dig in all the plumbing before the concrete pour, so I formed off that part of the floor to be poured later.

That's that.  Next blog, back to before the foam.